GAM Products, Inc.
GAM PRODUCTS, INC. • Tel:(323) 935.4975 • Fax:(323) 935.2002

TWINSPIN | Specifications | Instructions | Applications | Parts List | Purchase | MSDS


PRODUCT INSTRUCTIONS


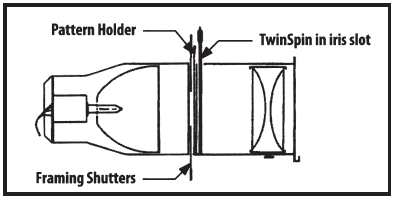
Fig 1. Ellipsoidal spotlight cross section

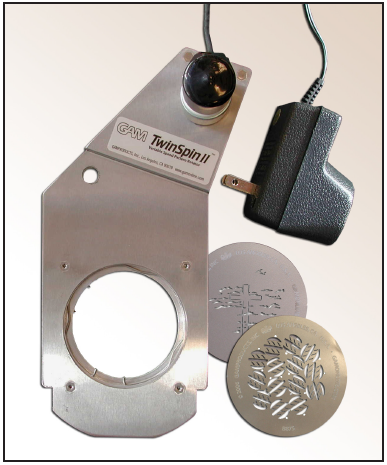
Congratulations on your new TwinSpin™. It will add an exciting new dimension to your pattern projections... motion!

PREPARING THE TWINSPIN™

Before inserting patterns or a TwinSpin™ in your fixture, it is important to align the lamp. Position it in the reflector so that the circle of light is as smooth and even as possible. When the field of light is truly flat, it will appear to be slightly darker in the center for a few moments (this is an optical illusion).

When the lamp is positioned too far into the reflector, the center of the field will look 'hot'. When the lamp is positioned too far back out of the reflector, the center will be dull and shadowed and the outer rim will look bright. Hot spots can cause warping of the patterns and may damage delicate designs.

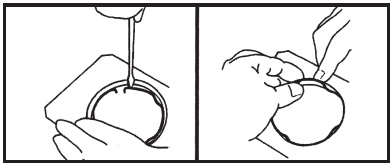
INSERTING A PATTERN IN THE TWINSPIN™ (See Fig. 2)

With the TwinSpin™ lying on a flat surface, center a pattern in the shallow well on the lip of the circular opening, then secure with a retaining ring.

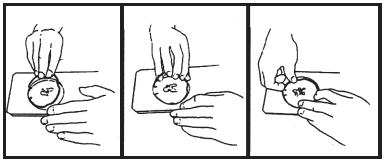
  1. Begin by pushing one end of the spring ring into the groove. Hold firmly in place with finger, pressing the ring against the pattern.
  2. Holding the ring firmly, work the ring around until it is completely in place.
  3. Finally, allow the hooked end to snap into place. Press the ring down gently with your finger to make sure it is tightly inserted all the way around.

INSERTING A TWINSPIN™ INTO THE FIXTURE

First, be sure that the lamp is properly aligned when preparing the fixture. Next slide the TwinSpin™ straight down into the iris slot in front of the pattern holder. Be sure it is seated straight and as far down as it will go. Secure the TwinSpin™ power cord so it does not contact the fixture housing. There is a safety cable mount hole in the TwinSpin™ near the motor. Use safety cable when mounting overhead.

Fig 2. Inserting retaining Ring

Tip: When using older warped patterns, be sure any
protruding edges are bent away from each other in the TwinSpin™ so they can't catch on each other while rotating.

CONTROL

The TwinSpin™ 6-step transformer can be plugged into any 120 volt outlet (230 volts if you have 230 volt model) and patterns will rotate at full speed when the transformer is set to 12 volts. You can also set the step switch anywhere between 3 and 12 volts to vary the speed, no dimmer is required. Do not use the 1.5 setting as voltage fluctuations may cause the TwinSpin™ to stall. The lowest setting should be 3.

Using a Dimmer

To easily start, stop, and adjust the rotation speed, plug the TwinSpin™ into a dimmer. Most types of dimmers will work, although speed range and resolution may vary. Electronic dimmers slightly clip the top and/or bottom of the speed range, but offer good resolution. The best results are produced by autotransformers.


Twinspin

GAM Product #TS5574
Rosco Product # 205 66705 0120


Click to view separate insturction sheet or download PDF
TWINSPIN™ OPERATING INSTRUCTIONS

GAM Twinspin II

TwinSpin™ with Built-in Speed-Control Model

If you have selected the TwinSpin™ with built-in speed control you can plug the power transformer into an AC line 120 volts or into a dimmer as well for control (230 volts if you have 230 volt mode). Using the potentiometer you can vary the speed of the TwinSpin™ without any other dimmer. The 6-step transformer allows you to vary the speed as well and you can use the 6-step transformer to set a speed and then use the potentiometer to more subtly slow it down for finer control. You can also plug it into a dimmer.

BURNING IN PATTERNS

When using new patterns with a TwinSpin™, they must be burned in slowly before rotating for the first time. This is done by placing the TwinSpin™ (with the patterns inserted) in the fixture. Run the lamp at full for approximately two minutes. Do not rotate the TwinSpin™. If the patterns are not burned in before rotating, they might jam.

HANG-UPS

If the patterns catch on each other, or if the retaining ring is not properly secured and slips, the TwinSpin™ may jam and stop turning. Turn off the motor as soon as possible to prevent seizing. Remove the unit to correct the problem, reassemble, then resume operation.

Fig 3. Removing the retaining ring

REMOVING TWINSPIN™ FROM THE FIXTURE

It's best to let the fixture and patterns cool naturally
before removing the TwinSpin™ from the fixture. Pulling it out 'hot' will cause warping and possible tearing of the
patterns due to the quick temperature change.

  1. Lift the TwinSpin™ straight out of the iris slot.
  2. Make sure the handle of the pattern holder behind it doesn't press against the patterns and dent them.


REMOVING GOBOS (See Fig. 3)

  1. Use a small pocket knife blade or flathead screwdriver and pry the hooked end of the retaining ring out of the groove IN toward the center, and UP.
  2. Pop the ring out of the groove and remove ring and pattern with your fingers.

QUICK CHANGES

If you need to change a hot pattern in your TwinSpin™, be prepared with a hot pad or gloves. The elements will be too hot to handle.

SPIN DESIGN

TwinSpin™ provides four design options. You may rotate a single pattern, two patterns with the same design or two different designs. The fourth option is to use one or two rotating patterns to animate a 'still', which is placed in the pattern holder. Refer to the GAM Catalog or visit us online to see over 800 patterns available.


--------------- CAUTION ----------------

TwinSpin™ is not intended for continual use in older 1000W ellipsoidal spotlights. For continuous operation applications we suggest the new cool beam units such as the ETC Source IV or the V Shakespeare.


The time in Los Angeles, California is 11:37 am Sunday, May 5, 2024.
The GAM staff is on duty to answer your questions from 8:00 a.m. to 5:00 p.m., Monday through Friday (except holidays).
For assistance, call toll free in the US and Canada 888-GAMCOLOR or 323-935-4975 (Country code 1).


Home Products Contact Us Send This Page Where To Buy About GAM